One major problem with backbends that most of us have experienced at some point is a sore lower back. Backbend-induced lumbar pain is the result of following the path of least resistance. Concentrating your backbends in the lumbar spine is simply the easiest thing to do. However, it’s neither the healthiest, nor the most effective path. If you want to deepen your backbends while keeping your lumbar spine safe, you really want to learn how to backbend (extend) your upper back while limiting the arch in the lower back. A great side benefit of learning to extend your upper back is that it also teaches you how to reduce hyperkyphosis (the dowager’s hump or hunchback) and its associated physical and mental health issues. These include heart and lung disease and depression, anxiety, and chronic stress.
Anatomy and habits both inhibit backbends in the upper back
The lower back is much more mobile in extension than the upper back. The thoracic spine (the upper back) does not extend as easily because it naturally curves forward. Moreover, each thoracic vertebra connects to the purposefully rigid ribcage. The rigidity of the ribcage, necessary for an efficient breath, further resists back-bending in the upper back. The lumbar vertebrae on the other hand can move more freely as they are only connected to each other. The shapes of the lumbar and thoracic vertebrae also differ in several ways. These differences also facilitate back-bending in the lumbar spine and limit it in the thoracic spine.
In addition, if you have been slumping forward in front of a computer (or mobile phone) for the past decade, you are even more likely to do most of your back-bending in the lumbar spine. When you slouch, the connective tissue in the front of the spine and the front of the ribcage slackens. Since connective tissue constantly remodels itself based on the stresses it experiences, tissue that is always slack is shortened over time to take up that slack. In addition, the constant slouching has lengthened and weakened the connective tissues and muscles of the upper back. The more you slouch, the harder it is to extend the upper back, but the more beneficial it is to learn this skill.
Make your backbends smarter than your habits
If you want to deepen your backbends while keeping your lumbar spine safe (and help reverse the problems of a slumping posture) even small changes in your upper back offer significant benefits. We only have 5 lumbar vertebrae compared to 12 thoracic vertebrae. If we backbend 50 degrees in the torso and don’t bend the upper back, each lumbar intervertebral joint on average has to bend 10 degrees. If we can reduce the natural forward bend of each of the 12 thoracic intervertebral joints by even just 1 degree, we can reduce the bend of each lumbar intervertebral joint to less than 8 degrees, while maintaining the same overall backbend.
How do we increase the mobility of the upper back to distribute backbends over the entire torso? Let’s borrow an analogy from yoga teacher Roger Cole. Imagine you have a bicycle chain with a stuck link. Grab a foot-length of chain and bend it back and forth. All the flexible links will move, and nothing will happen at the stuck link. But if you drape the frozen link over a fulcrum (i.e. the edge of a table) and apply a bending force, you can concentrate the force where you want it and get the frozen link unstuck. We will use this principle this week to open up the upper back using props to find more freedom in backbends while keeping the lower back safe.
Try it now: Passive backbend to stretch what is tight
Stand in front of a wall with what feels like neutral posture. Walk backwards until your buttocks and shoulder blades touch the wall. Resist the urge to pull the head towards the wall. Measure the distance between your head and the wall by observing how many fingers fit horizontally between the head and the wall. That distance indicates how rounded your upper back is. The more rounded it is, the harder (but more important) it is to learn how to backbend your upper back.
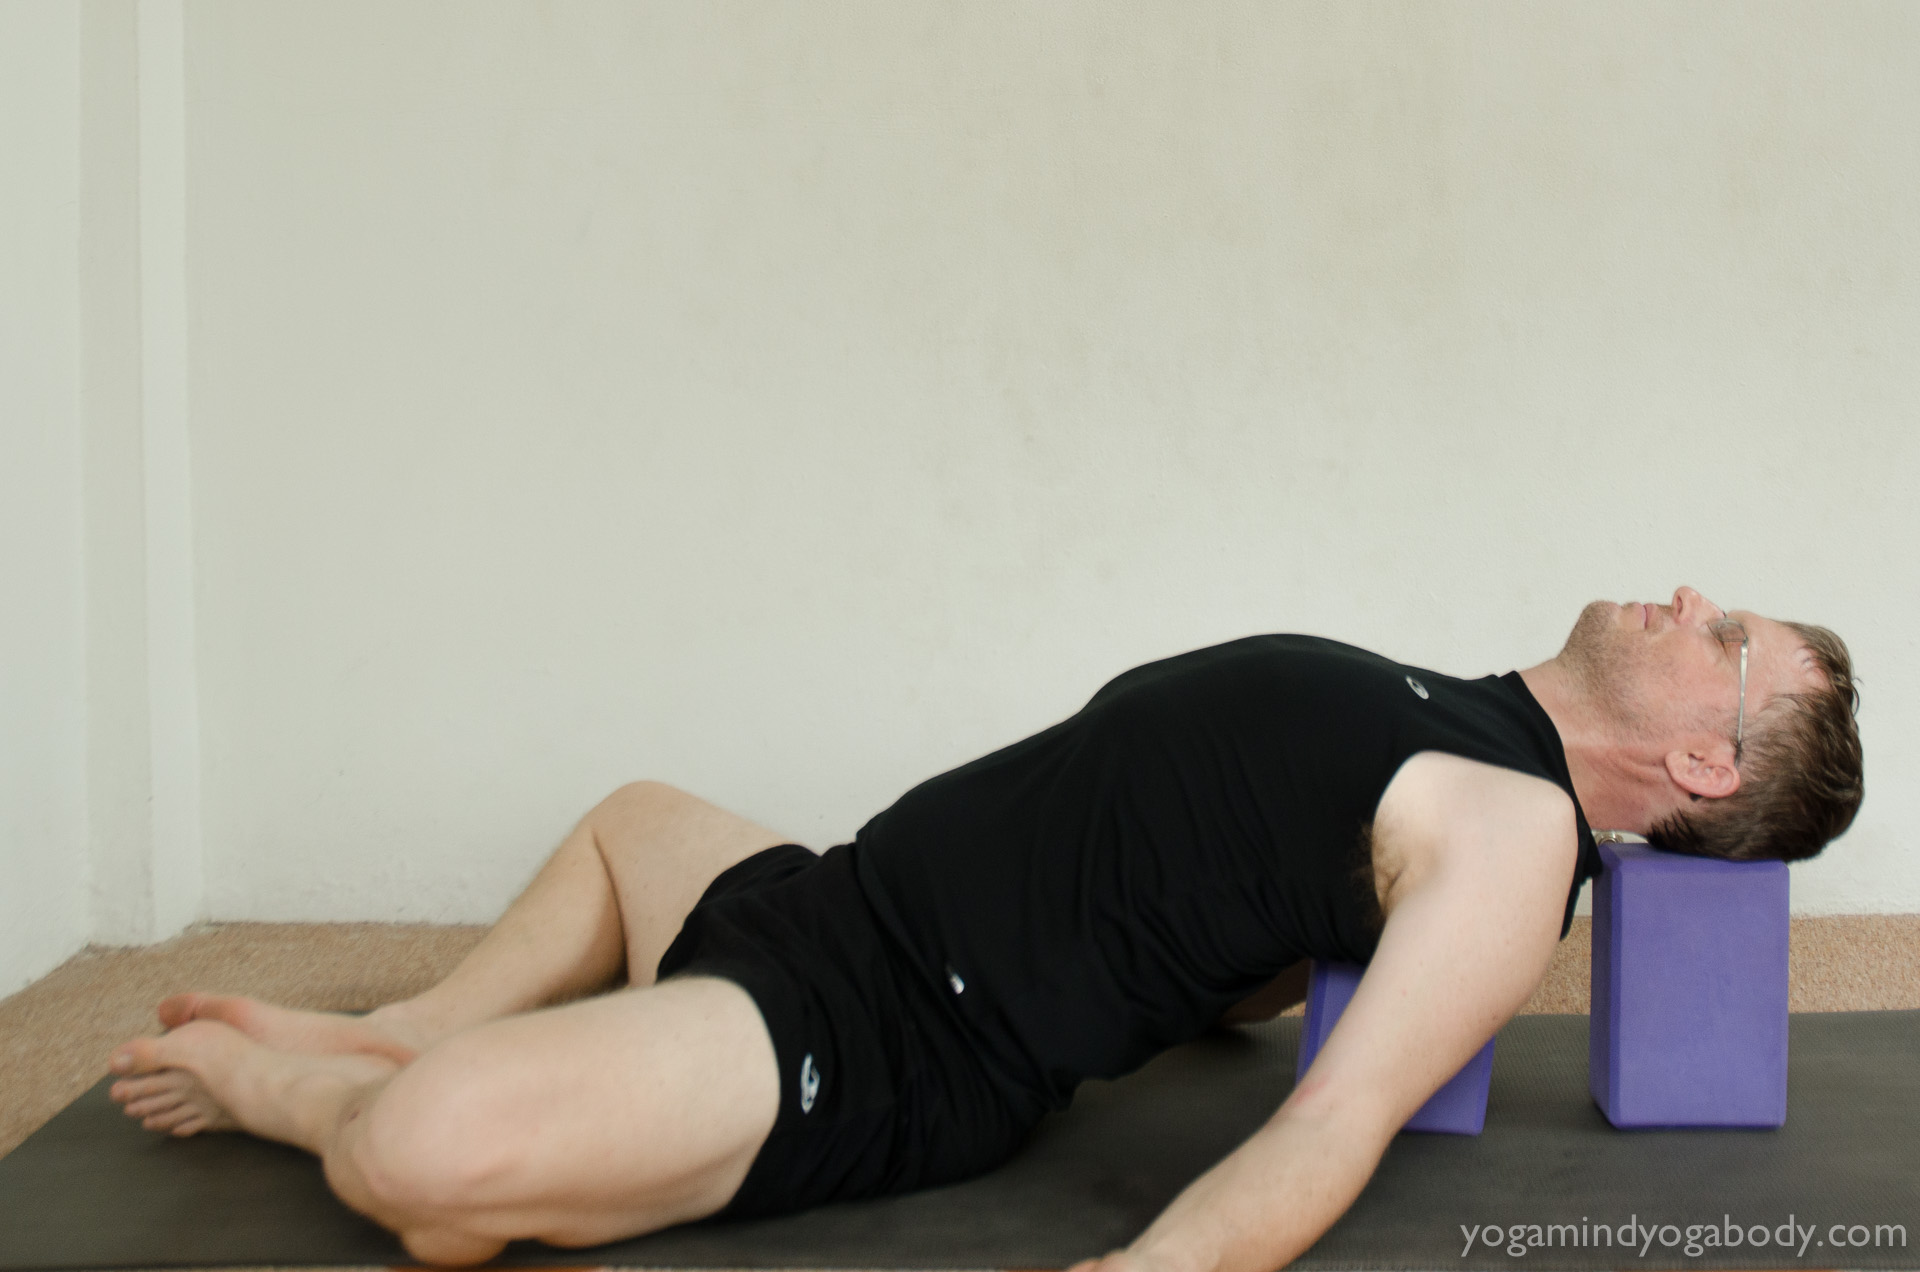
Get two thick (10cm, 4”) yoga blocks. If you only have thin blocks, get three thin blocks, or two thin blocks and a cushion. Place a shorter support (~15cm or 6”) under your upper back. Place a higher support (~22cm or 9”) under your head. If more than 5 fingers fit between wall and head), you may need a lower support under your back, or a higher support under your head.
Make sure that your shoulder blades are fully resting on the back support. Ensure that your lowest back ribs are not on the block. The unconscious tendency is to place the lower back on the support. That is counterproductive, as your lower back already knows how to back-bend. Another way to avoid the stretch in the middle back is to place the back support too high, under the upper shoulders and neck.
Try it now: Fine-tune the stretch
If you are unsure where to place the back support, move it up and down the back in 2cm (1 inch) increments until you find the position that gives you the greatest opening in the front of the chest. Make sure the head support is far enough away from the back support that it only supports your head, not your neck. Then release your arms out to the sides, palms facing up, and surrender into the stretch for 2 to 3 minutes or more.
If the stretch gets too intense, come out early or reduce the height of the support under the back. If you find that your neck is hyperextending, use your fingertips to barely lift the head off the block and gently guiding it with your fingertips away from your shoulders. Additionally, placing a thin pillow or towel on top of the block underneath the head may help. Savor the spaciousness in the front of the chest and accentuate it by directing your breath to gently lift your breastbone from underneath with each inhale.
When you are ready to come out of the pose, roll down to the floor onto one side, and sit up slowly using your arms for support. Resist the temptation to roll up by engaging the front of your torso, as that will pull you right back into hyperkyphosis. Come back to a neutral-feeling standing pose at the wall and walk backwards until your buttocks and shoulder blades touch the wall. Once again, resist the urge to pull your head back, and measure the distance between your head and the wall. Notice that the distance has probably decreased by at least a finger or two.
Try it now: Active backbend in the upper back
Staying at the wall, place one hand on your breastbone, and the other on your belly button. Once again direct your breath into the front of the ribcage to gently lift your breastbone from underneath with each inhale, allowing it to settle back down a bit with each exhale. With each inhale, allow it to float a bit higher, and with each exhale, allow it to settle not quite as far down as before. After about a minute or two, measure the distance between your head and the wall one more time, noticing whether it has further decreased. I call this action “floating your breastbone away from your belly button”, and it is the most effective technique I know for getting your thoracic spine involved in backbends.
Lastly, practice the breastbone floating action in a gentle backbend, like a Sphinx Pose. Exhale to tone your lower belly to protect your lower back. Inhale to allow your breastbone to float away from your bellybutton to get your upper back to participate in the backbend. Breathe and notice the greater continuity and spaciousness of a backbend that involves the upper back as well as the lower.
Leave A Comment